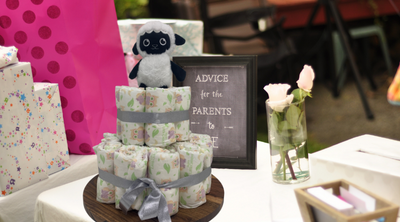
How to make a Diaper Cake
Share
Have you ever looked at a diaper cake and wondered how someone made that?

We’re here to help provide a step-by-step guide on how to make the perfect diaper cake! Whether you’re simply lacking time, just don’t know what to get or have to buy something on a budget, diaper cakes can be a thoughtful, inexpensive and time-efficient gift to give a new (or existing) parent.
Firstly, you’ll need to gather all necessary items to create the diaper cake. Some articles encourage all sorts of additional items to make the cake (e.g. glue gun etc.) however we have gone for a simplistic, easy yet effective way to make a diaper cake. You can also add more products onto the cake such as clothes, stuffed toys, shoes, baby wipes - it really depends how elaborate (or generous) you want to be.
The example that we’ve made includes two tiers however, many cakes can be single tiered, three or four tiered. The steps we have provided, and products recommended to create the diaper cake is based off what we created, so please bear in mind that if you want to create more tiers or add more items, you may need more products than we are recommending.
Items you’ll need to make a diaper cake

- 27 Happy Little Camper diapers
- 27 elastic bands
- 2m of ribbon (any colour)
- A tray or stand for the cake to sit on
- A stuffed toy
- A middle divider to shape and hold the cake (we used our Veeda hand sanitiser, but you can also use the inside cardboard cylinder found in the middle of a roll of paper towel). If you don’t have that, you can get creative, but remember that the receiver will see the inside of the diaper cake when they unravel all the diapers so probably best not to give them a half empty water bottle!

Step 1.
Roll up each diaper into a cylinder from the open end (top of the diaper) to the closed end (bottom of the diaper). Wrap an elastic band around the diaper so it stays put in the shape formed – see image on the left for a visual guide
Step 2.
Begin to form a circle of the rolled-up nappies standing upright on your tray. I found it easiest by starting on the outside of the circle and working inwards. Don’t forget to place your middle divider in the center of the circle to help the nappies stay together and form a nice round shape.

Step 3.
Tie some ribbon tightly around the first tier of the cake to keep the nappies in place wrapped around your center divider

Step 4.
Begin the second tier by following the same process as step two but working from the inside out. By this I mean start placing your nappies around your center divider and work outwards until you’re happy with the size
Step 5.
Tie ribbon around the outside of the second tier to keep the nappies in place

Step 6.
Add stuffed animal to the top of the cake or add any additional items you want to give. You can place them on top or around the cake etc. – you might want to take a few minutes to play around and find out what looks best where.
We hope that our step-by-step guide helped you form the perfect nappy cake gift!
To purchase nappies, wipes or hand sanitizer, click here.